Look, I get it. You want great caramel apples, but you've been hurt before by caramel apples. The caramel for caramel apples slides down off the apple making a huge mess, sticks to your teeth, is hard to bite into, and is overall just a horrible experience. You want the caramel apple of your fall dreams, and I've got it.
If you love caramel apples, check out these apple pie caramels.
Red flags in other caramel recipes for apples
I've gone over A LOT of other food blogger recipes for caramel apples, and some of the bigger red flags in recipes I see:
- recommending dipping cold apples
- cold apples + hot caramel = condensation. This causes a sticky mess. The "theory" behind this is the caramel will set up faster on a cold apple, but if you are dipping a thin layer on the apple to begin with, it's not going to retain that much heat and the caramel will set up.
- placing caramel apples in the fridge post dipping.
- there is no reason for this if you have the correct caramel recipe, because what happens when you take it out? The caramel slides right down and is a mess. You don't need to store caramel apples in the fridge because both caramel and apples are shelf stable products.
- say you can only use heavy cream for making caramel for caramel apples
- This is just so untrue and shows the person literally has zero background in anything candy making. You can use lots of different milk sources for making caramel for caramel apples
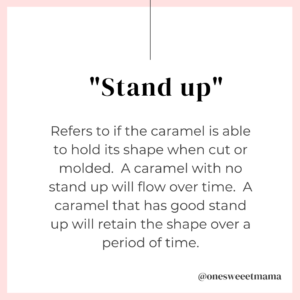
Stand up so it doesn't slide down
To make sure the caramel doesn't slide down your apple, you need to know about two things.
- The caramel has to have the right "stuff" in it. The right about of sugar, milk proteins, and syrup to make sure the caramel sticks around where you want it!
- Final cook temperature of caramel. The caramel MUST be cooked to a high enough temperature to drive off enough water. If too much water is left in the caramel, it's going to do what water likes to do... flow!
If you love learning the science behind candy, check out my milk sources for caramel.
Best apples for caramel apples
Apples have a waxy coating that will prevent the caramel from sticking, so it’s important to wash and dry it off. First, rinse and dry the apples. If the waxy coating is particularly thick, you may need to dip the apple in boiling water for a few SECONDS (you don't want to cook the apple) to help soften the wax so you can wipe it off.
After washing and drying the apples, pull off the stem and insert the stick for the caramel apples.
I personally like using Granny Smith apples because they are very tart, which balances out the sweetness from the caramel. You can use any apple you enjoy though! Some other popular ones are Honeycrisp, Fuji, and Golden Delicious. Whichever type of apple for caramel apples you use, look for:
- medium size apples. They will give the best caramel to apple ratio and are easy to eat than a massively sized apple.
- round with a good stem hole
- firm with no soft spots
Ingredients - caramel for apples
- evaporated milk
- cream
- butter
- salt
- sugar
- brown rice syrup
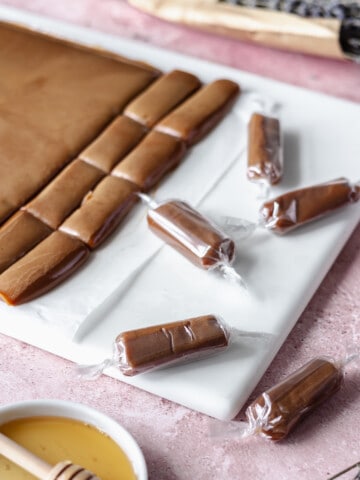
If you'd like to use corn syrup instead of brown rice syrup, the caramel will need to be cooked to 246F instead of 244F. Brown rice syrup contains more solids ("stuff") and less water than corn syrup, so an increase in temperature is needed to finish driving off the water.
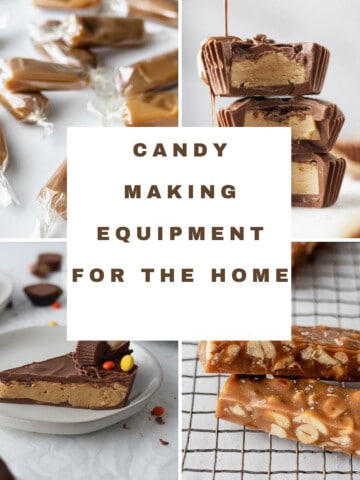
Equipment for homemade caramel for apples
- thick bottomed, heavy duty pot
- high heat spatula or wooden spoon
- candy thermometer
- caramel apple sticks
- parchment paper
- baking sheet
Instructions
- Line a 9 x 13" baking sheet with parchment paper
- Prepare your apples
- Cook the caramel
- Dip the apples
Dipping apples in caramel
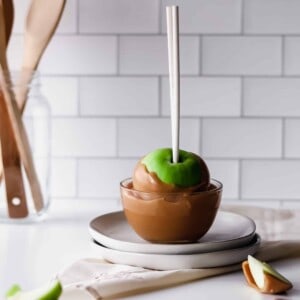
- Dip apples one at a time into caramel on an angle so it covers nearly to the top center (or all the way to the top if you don’t care to have apple showing through). Rotate and turn to coat apple.
- Lift apple and let excess caramel run off
- Place on parchment lined baking sheet to set up
Fancy chocolate covered caramel apples
These caramel apples would be great for dipping in chocolate after the caramel sets up! After dipping them in chocolate you could also roll the apples in additional toppings, such as:
- Sprinkles
- toasted coconut
- crushed cookies (Oreos or graham crackers would be great)
- chopped nuts
- chopped candy bars such as Reeses, Twix, or Butterfinger
- Mini M&M’s
If you did not want to dip the apple in chocolate but still wanted to have something on the outside, roll the apple in the topping after dipping it in caramel.
Storage and shelf life
Caramel apples have a fairly short shelf life and are best consumed within 1-2 days after dipping. I do not recommend refrigerating caramel apples because the caramel becomes very hard and sticky. In this recipe for caramel apples, you can store the caramel apples in an airtight container.
Recipe for caramel apple
Caramel Apples
Equipment
- thick bottomed heavy duty pot 8 quart minimum
- sticks for apples
Ingredients
- 9 medium sized apples
- 340 grams evaporated milk
- 240 grams heavy cream
- 340 grams sugar
- 4 grams salt
- 113 grams butter
- 285 grams brown rice syrup can be swapped for corn syrup, but increase final cook temp to 246F
Instructions
- Prepare apples by sticking stick into the stem section.
- Add all ingredients except apples to a large, thick bottomed pot.
- Cook on high until temperature reaches 244F, stirring the entire time.
- Turn off heat. Dip apples one at a time, allowing the caramel to drip off the bottom before placing it on parchment paper.
- Place on parchment paper. Cool for 4 hours. Seal in airtight container. Does not need to be stored in the refrigerator.
Charlene Denhaese
Why do you use brown rice syrup instead of corn syrup?
Hannah
You can use corn syrup as a 1:1 replacement for the brown rice syrup! I like the flavor it adds to this caramel.